Saturday, June 8, 2019

The Great Cape Caper--Done (almost)

How very odd.  I was coming on here to start writing about the next project (or two) now that I had finished writing about The Great Cape Caper.  And lo! and behold! -- I hadn't.  Maybe in my mind, or my dreams, but not here?  I even checked to see if I had a draft of a post--nope.

So--what can I say.  After 8 months (granted, three of those were on hiatus) its, well, over.  There's always such an anticlimatical feeling about that.  The purpose of a project like this is to be a project--a thing-in-progress.  When it's finished--well, then it's just a thing.

So--it's done.

Last blog post I was cutting and sewing and weaving endless trim.  So then it was all sewn, and all of that trim sewn on.  And the big fur collar that started all this was sewn on (I thought about making it tie on, or even snap on, so that the cape could be worn without it, but a) when am I going to wear this at all, and b) when would I wear it without the collar.

One thing still remains--I have copper penannular broaches that I made for fasteners--but I need to tie something between them.  I've tried a necklace that I have, and just some cording--don't like either of them.  Maybe I'll learn Viking knitting (which makes a flexible wire tube).  I have until Halloween to decide.  And now I need to make a dress to wear under it.  Which will be ironic.   This Great Cape Caper, in financial terms, cost me nothing.  I already had the fleeces on hand (in some cases, for a decade or two).  I had the dyes.  I even had the heavy copper wire for the broaches.  So the cape was free (except for the couple of hundred hours I put into it).  But it needs a dress or some sort of costume under it, and the only fabric that I think is the right texture is linen.  At $12 a yard.  So the accessory to the "free" cape will cost me $60-$80 (and more time).  For something I might wear once or twice.  Sigh . . .

But it's done. And I absolutely love it.  Despite the heavy appearance, it's lightweight (a couple of pounds).  Lovely drape. Heavily textured but subtle fabric.  Dramatic.  I took it to a party and people did the proper "ooh" and "ahhh" over it (and some even tried it on, despite the fact that it was close to 100 degrees.


Ahhhh.  *Now* on to the next project.


Tuesday, May 14, 2019

The Great Cape Caper: Sewing

Fabric having been woven and fulled--time to cut (gasp!) and sew.

I was using the pattern that alternated straight panels with rectangles.  The first cut was the hardest--I was expecting it to dissolve, but the fulling held everything in place even though the fabric was still quite gauzy.

To make the triangular wedges, I cut the fabric in half diagonally, then flipped one piece so that the narrow ends were together, butted the selvedges, and used a mattress stitch to sew them together, using the Lincoln thrums for thread.  Yes--I have some rippling edges there.  I had sleyed the selvedges more densely so they fulled a little differently.  I just smoothed them out the best I could while I was sewing.


Hint for using yarn as sewing thread:  run it over a cake of beeswax - - which is a fairly common thing to do when hand sewing even with commercial thread -- but then run a dry hot iron over it to melt the wax into the yarn.  It's stronger and smoother and even easier to use.

I folded the diagonal edges over about 1/2", then overlapped the selvedge edge of the straight pieces and sewed with a running stitch down both sides.  This covered all the raw edges.  As I had 5 straight pieces alternating with 4 wedges, this took awhile.  I listened to Neil Gaimen read his Graveyard book, and also took this time to make some dye samples.

Fortunately my work table is where I can also keep an eye on my stove.  I knew I wanted to make trim for all the edges of the cape (for appearance, and to protect those openweave edges).  I had thought about cardweaving, which would be more authentic--but this cape is pure fantasy.  Cardweaving is slower and produces a thicker band; using the loom would be faster.  I picked out the pattern called "Walls of Troy" because I like the interlocking zig-zag design.


I used pattern # II

 I wanted a glossy, non stretchy yarn for this so I went stash-diving again.  I spun up some Leicester Longwool, but I wanted a fairly tightly spun yarn and this wool became quite wiry. Diving deeper, I found a bag of Cotswold that had been given to me--like the Lincoln, about 15 years or more ago.  While also a fairly coarse wool, it was softer than the longwool but still had the high shine that I wanted.  The Lincoln samples didn't go to waste, though, because I used them for my dye samples.  Different types of wool will take dye differently, but the longwools will be quite similar.

I really had no idea of what colors I wanted for the trim.  I wanted it to define the edges, but not be the star of the show.  So I simply dyed a bunch of colors and then auditioned them against the cape fabric.  My technique for sampling is to use mason jars and 10 grams of yarn or fiber.  Four of those will fit in a pot (alas--my pot that was big enough for 5 sprung a leak).  I fill the pot about halfway with water, bring it all to a boil, and then let it sit until cool.


I chose to use the green (second from the left) and a lighter version of the copper (sixth from the right).  I used the Dharma acid dyes:  the green was gold ocher and black in a proportion of 7:3, at .9% depth of shade.  The copper was gold ocher and violet in a proportion of 9:1 at a 1% depth of shade.

So at this point the work schedule was going to my studio when I had a reasonable length of time to sew, run dye samples, and listen to Gaimen.  During TV watching time in the evening, I combed and spun the Cotswold.  The trim took almost 500 yards of yarn.

I wove about 12 yards of trim.  Putting that length of warp on a loom at only 1 inch wide and keeping the yarns from slipping is, well, impossible.  I didn't even try.  What I did was to rig up my warping trapeze, toss my warp over it, and tied it to plastic cup with 1 1/2 pounds of weight in it.  (That took sampling--1 pound was too light and 2 pounds was too heavy)  That way I could weave about 5 feet before retying the warp down further.  This turned out to be a brilliant way to weave.  This little loom has only about a 5-6" weaving depth before you have to advance the warp--but all I had to do was crank it on; no releasing the break and no resetting the tension each time.


I enjoy weaving but have to admit that this got a bit tedious at 20 ends and picks per inch.  So I would weave for awhile and sew for awhile.  I couldn't even listen to audiobooks while weaving because I had to focus on the pattern.  When I had finished sewing the cape pieces together, I cut off enough of the woven trim to start sewing the top and side pieces on when I needed to take a weaving break.

I think I looked at this view forever.


Monday, May 13, 2019

Time to Weave: Sample First, Weave Second

Sampling is the bane of the fiberist's existence.  It takes time; it takes yarn.  Neither of which you want to "waste" when you really want to jump into the project.  But samples give you information--how the materials are going to work, if they're going to shrink (and how much) when washed, what is the best fiber/yarn/color combinations.  If you don't waste a little time making samples, you're going to waste a *lot* of time and yarn when the finished project ain't right.

Fortunately, in this case, I had already done two big samples--the shawls I wrote about previously.  That told me that my default yarn (24 epi, 2 ply) would weave up well at 6 ends per inch.  What I really needed to do was audition different fibers for the weft yarn, and see how they reacted for the fulling.

So here's my audition strip (all fibers chosen from my rather extensive stash)


Right to left that's black alpaca, brown CVM (California Variegated Mutant--who names these breeds?), light brown alpaca, and the brown Lincoln.

I nixed the two alpacas--I liked the matching color better.  I was pretty sure I didn't have enough of the Lincoln for the warp and weft.  Besides, when I had made the shawls, by the time the fabric had fulled enough  to hold together it had developed quite a fuzzy halo, and that's not what I wanted for this cape.  CVM has a stronger crimp (Lincoln is wavy) and would be more likely to draw up easily.
By now I had my 2000+ yards of the Lincoln spun.  I needed close to that amount of the CVM.  I prepped that on my drum carder -- while I prefer combed wool, carding makes a lighter, loftier yarn.  And I churned out another 2,000 yards.  The warp yarn I had washed to allow for any drawing up of the yarn.  The weft, on the other hand, I left unwashed.  I wanted any drawing up to happen in the cloth.

And let the weaving begin.  I wound off the first 9-yard panel (120 ends) and onto the loom it went.  It was making me nervous.  The spinning had gone well, and putting the warp on the loom went well (a rarity--I usually develop Tourette's while warping the loom) and the weaving went well and smoothly.

Fabric on loom--you can see how it looks like window screen


Then came the scary part--cutting it off the loom and washing it.  I sewed the two ends together (it seems to make the fabric full more evenly) and into the washing machine it went.  My two shawls had taken 15-20 minutes to full.  This?  Thank goodness I was paranoid and checked almost constantly, because samples lie.  From my samples I had expected about a 15% reduction in width from loom to finished fabric.  Meaning that my 18" wide fabric should go down to about 15 inches wide--my target width.  But in 4 minutes it was down to 13".  Yikes--pulled that out.  But after drying and ironing, the fabric was soft, not fuzzy, and surprisingly stable.  First length--success!

Second length . . . also a success!  This was the most drama-free weaving I have ever done.

Fabric before and after fulling; you can see how much denser it becomes


Saturday, May 4, 2019

The Great Cape Caper--Warp Yarn and Pattern

Because all things textile begin with yarn (well, OK, not felt . . .)

I wanted this cape to go with the collar, which meant using the rest of the brown Lincoln wool.  For the collar I had pulled out the grays and lighter browns as well as the dark browns to give a feeling of depth.  This left the dark brown for the cape, which would coordinate but not be too matchy-matchy (do I sound like I watch Project Runway?)

This fleece was a gift about 15 years ago from a shepherd who was getting out of the business.  I had washed it before storage but decided to rewash it to freshen it up a bit.  Then I got to play with All. The. Toys.   Because of the long-term storage it resisted being pulled apart, so I opened it up with my picker.  The staple length was quite long--5" or so--so I combed it with my English 5 pitch combs.  This gave a beautiful top--and a *lot* of waste.  I didn't have an infinite amount of fleece--and this was irreplaceable--so I ran the waste through my drum carder to straighten it, and then combed that with my St. Blaise 2 pitch combs.  What was waste from that was pretty unspinnable so it went to a ditch for erosion control.

I did a few samples on a couple of wheels and then made the intelligent choice to go with my default yarn (which tends to be 24 wraps per inch, two ply).  After all--if I had to be spinning literally miles of yarn it might be nice to not have to think about it.

And thus began the Marathon of Spinning.  How much?  I had no idea.  Some people would design the entire project and then, armed with all the necessary knowledge, begin.  That's not how I work.  I scatter the parts around.  I knew that I would need a boatload of yarn (that's an exact amount) so I could be spinning that while I dickered around with patterns and figured out how much a boatload of yarn is.

Pattern.  A basic cape is pretty simple--you take a half circle of fabric, cut a neck hole in the middle of the straight side--hem, trim, whatever--and you have a cape.   But you need to look a little closer to see what's going on.

The first is the basic cape.  But look at those lines I drew there--those are the warp lines.  A fabric hangs differently from the warp than it does from the weft (and I was planning on using a different fleece for the weft).  Especially a very loosely woven fabric.  So the fronts would hang on the warp, the back would be hanging along the weft, and the shoulders would be on the bias.  Problems could occur.

You could keep the grainlines consistent by using the second pattern--wedges.  But the problem there is that you are sewing a diagonal edge to a diagonal edge.  Fabric likes to stretch on the diagonal (aka bias) so there are also potential problems there.

I had my Eureka! moment when I found the last pattern on the deviant art page (not certain why a cape is deviant, but thank you eqos.deviantart.com).  Alternating straight panels with wedges keeps the grainline consistent, and each diagonal is sewn to a straight edge, keeping that bias under control.  A *huge* added bonus is this:

The cutting pattern (you have to use it twice).  The bonus is that is uses *all* of the fabric--no random corners or curves cut off and discarded.  Trust me--when you've spent a gazillion hours spinning and weaving, the last thing you want to do is throw any of it away.  I modified it a bit to use narrow panels rather than wide ones cut in half lengthwise (which would give me non-raveling selvedge edges on the straight panels).  I wanted the panels to be 15 inches wide.  There would be some shrinkage, so I wanted to weave at 18 inches wide.  To have some sturdy selvedges I doubled the yarn for 6 ends at each selvedge.  I was going to weave this in two 9-yard panels (because my loom can't handle a super-long warp) so tapping on the calculator I needed:

120 ends of yarn x 9 yards x 2 panels = 2, 160 yards of yarn (plus extra for making samples.)

Good thing I'd been spinning while figuring all that out.


Thursday, May 2, 2019

The Great Cape Caper--weaving decisions

Can't escape this obsession--the cape is going to happen.  What makes it really ridiculous is that in the 90's I spent about 10 years talking myself out of a handspun, handwoven cape--and then made one.  Lord of the Rings pushed me over the edge.  Thanks to the internet, I even tracked down the flock of sheep (New Zealand, Stansborough Gotland) that supplied the wool for the fabric and bought a couple of fleeces.  I don't really live in a cape-wearing climate or have a cape-wearing lifestyle, but I'm still happy that I did it.  Gotta embrace the crazy.

Finished that one in 2003--so it's been 14 years.  That one also took about 10,000 yards of spinning and I didn't really want to go *that* crazy again.  And it was also rather civilized (after all, it was Elven).  This time I wanted to go more barbaric--think "Vikings" (quotes because it will have nothing to do with being any kind of reproduction) or "Game of Thrones" (also quotes because I don't watch GOT--read the first book, saw the first episode, and decided that was enough violence for me).

So now I have to go back to a couple of projects from last year.  I have been intrigued with the idea of a loose, openwork, gauze-like fabric.  This was spurred on by an article in Spin-Off  where the author made a gauzy stole with inset leaves.  The leaves didn't do it for me, but I loved the fabric.  Then Sarah Swett (whose blog I follow) (https://www.afieldguidetoneedlework.com/) did a series of open gauzework weavings.
And while most people are drawn to fancy designs and great colors, I have a fondness for, well, brown.  Something that most people would pass by whispers to me.

I had a bag of brown BFL (blue faced Leicester--a sheep with long shining but soft fleece).  I spun it to my good ol' default yarn (2 ply, about 24 wraps per inch), and put it on the loom.  Normally this size yarn would be sett and woven at 12 wraps per inch--I did it at 6.  To be honest, I sort of expected it to just fall apart when I took it off the loom but it didn't, but it was quite sleazy.


  Fabric this open needs to be "fulled"--washed and agitated so that it shrinks slightly and clings together.  With a pounding heart it went into the washing machine--with me pacing the floor and wringing my hands and pulling it out every three minutes to check it. Three minutes:  Nothing.  Six minutes: nothing.  Nine minutes:  nothing. Twelve minutes: nothing.  Fifteen minutes: nothing.  Eighteen minutes: too far!!  It suddenly looked like a drowned rat.  Damn.  Chalked that up to experience.

Except that I hung it up to dry, and as it did, I found myself petting it and stroking it and straightening it out and generally being nice to it and then I decided that I really loved it and now it's my wrap at night for sitting up in bed and reading.  It's fuzzy and soft and warm and very very light.  I even got a bonus of subtle stripes; when I put it on the loom the reed (the thing that controls how many ends per inch you get) was eight ends per inch so I skipped on a regular basis to get six.  Normally this skipping comes out in the wash but in this case they slid together to make stripes.


With that success, I wanted to do it again.  Stash diving, I found a skein of blue BFL.  Several years ago I had lost my spinning mojo and my local yarn store had this blue roving so I got it just to spin.  Blue just isn't really my color, but at least I was spinning something.  As I looked at it, I wondered how to knock down the blue (pretty dark, so overdyeing wasn't an option) and I thought that if I wove it with something on the opposite side of the color wheel it might work.  I spun up some more white BFL that I had (it is good to have a stash) and dyed it a copper color.  The combination worked--it's almost iridescent, being blue or copper depending on how you look at it.

Time to full this one.  This time I went a gentler route.  Rather than the machine, I did it by hand, with the alternate method of dunking alternately in very hot water, then ice water.  Like the last one, it took awhile (about a half hour) and then fulled suddenly and dramatically--so it's also very fuzzy.  I like it--maybe not quite as much as my first one, but it's good.  I had sleyed this one evenly (I used a reed that ran 12 ends per inch and used every other slot), so it didn't have the stripes of the first one, and I missed those.


And for some reason I don't have a "post fulling" picture."

Although I had problems in the fulling, the success of these made me think I wanted a gauzy fabric for the cape.  Onward . . .


Thursday, April 18, 2019

The Great Cape Caper

Sometimes you get an itch you just gotta scratch.

My name is Ann, and I like to make things.  Whether I need them or not.  Whether they are useful or not.  Just because I can, or to see if I can, or just because.

People such as I should not cruise Pinterest, because we see things like this:


That's just so wonderfully barbararic.  Me want.  So me make.

Dive the stash.  Some time back (15 years? 20?) a shepherd I met online was getting out of the business and gave me some Lincoln fleeces.  I still had the brown one--I dug it out and started pulling and separating the locks.

I also had some dark brown California Variegated Mutant fleece (my all time favorite sheep breed name).  That felts quite a bit easier than the Lincoln.  I carded it up, laid it into a crescent shape, and felted it--my favorite method of felting is to wet it with a bit of soapy water, cover it in plastic, and then go over it with a small hand sander minus the sandpaper.  This is so much faster than rubbing by hand, even if the vibrations do make you go numb after awhile.  Then I would lay out a row of locks, cover the ends with a wispy bit of the CVM, and felt it down.  Repeat.  Repeat.  Repeat.  Repeat.


The fleece had some varigations so I chose some dark and most of the lighter locks to give some depth to the piece.  It came out quite a bit fluffier than I wanted so I did some "monkey grooming" with a bit of hair product.  All in all, this collar took about four hours, which is a heck of a lot faster than spinning and knitting or weaving.

I didn't happen to have any Viking broaches in my stash but I did have some heavy copper wire that I beat and twisted and made into a pair of penannular broaches.  That with some random jewelry made a closure.

Final product--not bad!!


Of course, now it has some crumbs in it because I had it on my mannequin in the guest room and Dingo the flying squirrel liked to escape from his cage and snuggle in it to have a peanut.

So all was well and good and that itch was scratched and now I could get onto more practical things.

Except . . . . this collar really needed a cape to go with it, right?


Saturday, April 6, 2019

Autumn Leaves--the Details

The fiber--Blue Faced Leicester in the colorway "Autumn Flame" from Greenwood Fiberworks.

Spun-while-walking on a Caroline Hershey medieval-style spindle with the technique called "in-hand" or "grasped" or what I call "twiddled."  It never leaves your hand--I can only describe it as support spinning with nothing to support it but physics.  It's a relaxing way to spin, if you keep your fiber on a distaff (I use a hand ring distaff).  Both shoulders are down and relaxed and there's no spindle swinging around to be grabbed by cats (or, on one memorable occasion, a peacock).


The pattern is a lace leaf pattern by Jackie Erickson-Schweitzer.  For copyright reasons I can't show the charted lace pattern here, but for me it's a real bugger.  I've knit a lot of lace, but it's always been the kind that has one row with lacework followed by a plain row, which sort of helps lock things in.  This one has patternwork--and a lot of it--on every row.  So if you drop a stitch, mayhem occurs.

My first leaf took four hours.

My eyeballs crossed trying to look from chart to needles every stitch--too easy to go up or down a row.  So I transcribed it (fortunately it's only 56 rows).  That helped.  A bit.

My usual knitting time is in the car when Bob and I are running errands.  I thought this would be too complicated for that.  My other knitting time is in the evenings, watching TV with Bob.  This didn't exactly work--I really have to focus on the knitting.  Sometimes I would knit and rip a row two or three times before I got the count to come out correctly.  I developed a bad case of what Bob has named "Project-Induced Tourettes".

It helped to count the stitches after every row--so I could fix mistakes before I discovered them knitting the next row.  It also helped to buy new needles.   I had been using my Knitter's Pride needles (my favorite brand), of a dark multicolored laminated wood.


Pretty--but they were also pretty close to the colors in my yarn.  I was having enough problems with this pattern without having problems seeing the stitches themselves.  So I ordered another set of needles of laminated birch.  Funny how being able to see what you're doing helps.

I say needle sets because I'm knitting these with three sizes of needle (small size 2, bigger size 2, and size 3) so the leaves will be slightly different sizes.

And one day, errand running, I decided What the Heck and tried knitting them in the car.  Turns out that not having a TV on to distract me, and working in natural light, actually worked quite well.  So now this project has officially become a multi-task project, being spun while walking and knit while riding.

I finished spinning the first braid.  That one I had opened up with my combs--which worked, but left me with a lot of leftover smaller pieces.  For the second braid I used my drum carder to open up the fibers and keep the various lengths (which ranged from 2" to 8") mixed together.  I also decided that it needed a contrast color--not the weird blue of my inspiration picture, but green, for the leaves that haven't turned yet.  Fortunately I had a couple of ounces of BFL roving so into the dyepot it went (Kelly green with about 10% added black).  The second round is ready to go.


It's also going on the back burner.  I'm in no rush to finish this, as I won't be able to wear it until November or so.  So it will get knit in the odd moments (probably mostly in the car) and just sort of simmer along until done.


Wednesday, April 3, 2019

Autumn Leaves

Although I have more shawls than I will ever be able to wear, given our short Florida Winters and the fact that I love to make fancy shawls but don't have a fancy lifestyle--I'm working on another shawl.

I  wanted another "spin and knit as you go" project.  I try to walk around our property (3 laps = a mile) once a day, and I love to spin while I walk.  But I enjoy it more if I have something that will be made from the yarn-- and it also encourages me to keep walking so I'll have enough yarn for my knitting.

For a few years now I've played with the idea of leaves.  According to my Ravelry notebook,  I've been gathering ideas for  over three years (no rush--really don't need another shawl).  Sometimes literal.


Sometimes more impressionistic


I kept coming back to this more literal one


(although what's with the blue leaves?)

Instead of the leaves in the pattern (and I'd have to buy the book that the pattern is in to get it) I wanted to try a lace leaf pattern that I bought at a spin in by Jackie Erickson-Schweitzer, probably about 15 years ago (it's a pretty daunting pattern)

So--I had my pattern.  Now I need yarn.  By happy circumstance, my favorite indie dyer (Greenwood Fiberworks) just happened to have BFL braids (a wool that I love) in an Autumn Leaf colorway (with no weird blues).


At first I just tried spinning from the end--but the yarn came out a bit heavier than I wanted, and overlapped a color change.  So the first leaf looked like this.


Not bad, not quite right.  I had bought two braids (8 ounces), but I wanted the leaves to be a bit more light weight and delicate.  And possibly only one color.  The braid was dyed in sections of about 4 inches.  I pulled them apart and made piles of each color and then used my combs to open them up.  The fluffed up yarn drafted more easily, hence more finely.  It ended up being my default yarn, with the final 2-ply being 24 wraps per inch.  I don't have a problem with the idea of a default yarn--if I'm going to be spinning this over a long period of time, while wandering around and admiring the great outdoors, I don't want to think about it too much.


The original leaf is the two-toned one.  You can see that the others are finer.

To be continued . . .


Tuesday, February 19, 2019

A Project Blog?

Just barely got back to my new/old blog after about a 10-month hiatus (new/old because I lost access to write in my old one and had to start a new one.  If anyone is curious March 2010 to February 2018 is at http://ann-newsfromtheswamp.blogspot.com/   and the new one is at https://returntotheswamp.blogspot.com/).  And now I've decided that I need a separate project blog.

I do mention my various projects on my main blog, but not any details about what goes into making them.  I've tried just keeping regular journals, but I don't keep them up.  Somehow, putting it on some sort of public record (even though in these days of Twitter and Instagram I admit that my blogs rarely get read) makes me more likely to keep it up.  Maybe.  I hope.

Anyway--Demon Thread.   A homage to a late and much-missed friend who always described my obsession of all things fiber as "Demon Thread."

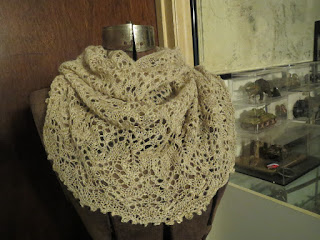
And so, without further ado, my first (and finished! project of 2019: a silk/camel cowl.

This was actually a remake of a silk/cashmere cowl  (the "Graveyards and Ghostlights" pattern on Ravelry  :https://www.ravelry.com/patterns/library/graveyards-and-ghostlights)    that was my travelling knit in 2015.  Just to brag, here's in "in progress" shot in the Paris airport.


And the finished cowl:


Which is luscious and soft and beautiful and I loved it even though I admit that it really didn't look like this when I wore it.  I had made it too big around so it sort of hung in a big loop unless I kept pulling it up and messing with it. (I also made it longer than the pattern but I liked that) Loved it anyway.  Love my niece more, so after the hurricane when she lost about everything I gave it to her.

But in my stash I had a couple of ounces of a silk/camel hair blend left over from another project, and though I would replace the cowl.  But I spun this a little heavier than I usually spin for lace.  The yarn for the original cowl had been one ply of cashmere (very fine, because I'm a cheapskate and cashmere is expensive) and one of silk.  This blend was a streaky blend--you could clearly see both the silk and the camel down.  And if I spun it too finely the silk would spin out and leave me with a handful of down.  So I spun from the fold, and a bit heavier.  The final yarn was about 20 wraps per inch  (my default yarn is 24 wraps per inch, and my lace 30+).

I wanted the cowl to fit around my neck and then flare out, so I started with size 3 needles, and then moved up every few inches until I finished with size 6.  I used pool noodles to block the shape.


And the finished cowl: 


And I will admit I'm not that happy with it.  Again--even though I *swear* I sampled for gauge and reduced the number of repeats, it's still too big around.  I think I'd be happier with a finer yarn (but see above--this fiber didn't want to go any finer).   I don't particularly like the look of it being knitted with the larger needles--it lacks pattern definition.  But the main problem is that there is a fine line between "drape" and "droop" and this cowl crosses it.  When worn, it just sort of collapses.


(The display form, by the way, is a dress form from the early 1900's.)


I'll wear it (and I might even do a bit of smocking around the top to make it smaller and hopefully help the shaping) but it won't be a favorite.

So there may be a third iteration of this, because I really love the pattern and want to make it work.  Eventually I'll get my hands on some more cashmere or something equally luscious and do it again!